Last Updated on 09/06/2025 by SAVORY DELIGHT RECIPES LLC
A surprising 67% of Americans find it challenging to cook meals at home during busy weeknights.
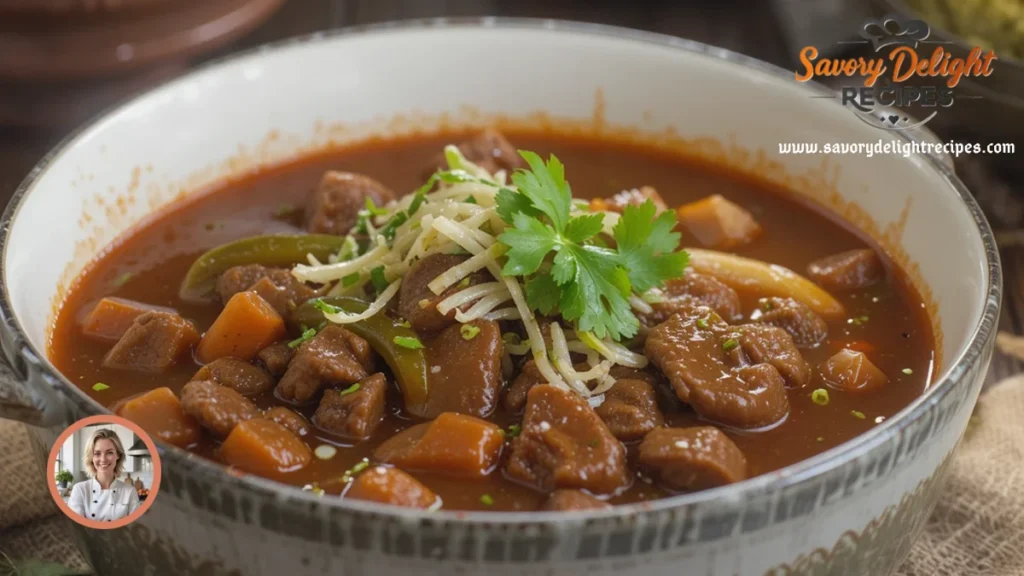
Many believe traditional Mexican dishes like caldo de res are impossible to make quickly. This hearty beef soup, also known as sopa de res or cocido soup, usually needs hours of simmering to create its rich, comforting flavors. The good news? You can still achieve authentic taste without the long wait.
Smart ingredient choices and modern cooking methods help you create a mouthwatering caldo de res in minimal time. This piece shows you how to craft this classic Mexican beef soup quickly using an Instant Pot or your stovetop. You’ll learn to make it without spending endless hours in your kitchen.
Your weeknight dinner routine needs a delicious upgrade. Let’s discover how to create caldo de res that tastes like it’s been simmering all day – even with your busy schedule.
Essential Ingredients for Quick Caldo de Res
A flavorful quick caldo de res depends on choosing the right ingredients. You can create this hearty Mexican soup without sacrificing taste by using these key components.
Time-Saving Meat Choices
Bone-in beef shanks (chamberete) are the foundations of authentic caldo de res. You’ll get the best results by combining beef shanks with chuck roast or top roast to create tender, flavorful meat. Here are some time-saving alternatives if beef shanks aren’t at hand:
| Cut Type | Benefits |
|---|---|
| Beef Chuck | Good fat ratio, tender results |
| Short Ribs | Rich flavor, quick-cooking |
| Beef Marrow Bones | Adds richness (optional) |
Must-Have Vegetables
A reliable selection of vegetables adds both nutrition and authenticity to your caldo de res. These vegetables will make your soup complete:
Core vegetables:
- Corn on the cob (cut into rounds)
- Carrots (thick chunks)
- Potatoes (large cubes)
- Cabbage (wedges)
- Zucchini or Mexican squash
- Chayote (if available)
Pro Tip: Larger pieces of dense vegetables like carrots and potatoes help prevent them from turning mushy as they cook.
Pantry Staple Substitutions
Smart substitutions help maintain flavor while cutting down preparation time. Your broth base needs:
- Aromatics: Garlic, onion, and bay leaves create the essential flavor base
- Tomato Options: Fresh Roma tomatoes work best traditionally, but tomato paste serves as an excellent quick alternative
- Seasoning Basics: Salt, pepper, and cilantro give that authentic flavor
Time-Saving Tip: Your grocery store’s produce section might have pre-cut vegetables. They cost more but save precious time without affecting the final taste.
The traditional recipe calls for 10 cups of water, but you can speed up cooking by mixing beef broth with water. This combination adds instant depth to your soup’s flavor profile.
Preparing the Flavorful Base
The magic of a perfect caldo de res starts with its base. You can develop deep, rich flavors by mastering a few simple techniques, even with limited time.
Quick Browning Technique
Heat your pot on high heat – you can use a traditional Dutch oven or an Instant Pot’s sauté function. The meat’s browning is a vital step that creates complex flavors in your caldo de res. Brown your meat pieces in small batches to ensure each piece touches the hot surface properly.
Pro Tip: A light coating of olive oil on your meat pieces before browning will improve caramelization.
Building Rich Broth Fast
A flavorful broth comes from a two-phase cooking approach. Here’s your timing guide:
| Phase | Components | Duration |
|---|---|---|
| Phase 1 | Meat + Simple Aromatics | 2.5-3 hours traditional / 30 mins pressure cooker |
| Phase 2 | Vegetables + Additional Seasonings | 30-40 minutes |
Mix your browned meat with 12 cups of water. Add your base aromatics: whole garlic head, chopped onions, and bay leaves. These ingredients create your broth’s foundation.
Seasoning Shortcuts
These seasonings will create the best flavor:
- Whole garlic head
- Bay leaves
- Fresh cilantro bunches
- Mint and green onion (they’re your secret weapons for distinctive flavor)
Important: Your broth will form foam on the surface as it simmers. Use a sieve or spoon to remove it regularly. This step gives you that restaurant-quality clear and attractive broth.
The Instant Pot makes flavors more intense by locking in moisture and concentrating ingredient tastes. You’ll get the same rich flavor profile much faster than traditional methods.
Taste and adjust seasonings while cooking. Traditional methods need 2.5 to 3 hours for tender meat, but a pressure cooker cuts this time while keeping your caldo de res authentic.
Time-Saving Tip: Mix beef broth with water instead of using pure water to speed up flavor development. Your meat’s bone marrow will still give that signature rich taste.
30-Minute Pressure Cooker Method
Make your traditional caldo de res into an easy weeknight meal using pressure cooking. The Instant Pot and similar modern pressure cookers reduce cooking time significantly. They intensify flavors by locking in moisture and concentrating ingredients.
Instant Pot Setup
Your pressure cooker should be clean and properly assembled before starting. An 8-quart pressure cooker works best with these steps:
- Add your browned meat to the pressure cooker
- Cover with 3-4 liters of water (staying below the maximum fill line)
- Add your prepared aromatics (onions, garlic, and bay leaf)
- Secure the lid and ensure the sealing valve is in the correct position
Pro Tip: A clearer broth comes from soaking and rinsing the beef before cooking. This step takes about an hour but creates a more refined final product.
Cooking Time Guidelines
The best results come from cooking your caldo de res in two distinct phases. Here’s your timing chart:
| Phase | Contents | Pressure Setting | Duration | Release Method |
|---|---|---|---|---|
| First | Meat & Aromatics | High | 30-40 mins | Natural |
| Second | Vegetables | High | 4-5 mins | Quick |
The pressure cooking sequence works like this:
- Original meat cooking cycle: Set to high pressure for 30-40 minutes
- Natural release period: Allow 10-15 minutes
- Vegetable addition: Add your prepared vegetables
- Second cooking cycle: High pressure for 4-5 minutes
Safety Tips
Safety details matter when pressure cooking. These guidelines are essential:
Pressure Release Methods:
- Natural release works best after cooking meat to prevent foam splashing
- Quick release suits the vegetable cycle
- Steam release valve should stay away from face and hands
Important: Your specific Instant Pot model and altitude might need different cooking times. Start with these recommended times and adjust based on results.
The pressure cooker creates a more concentrated broth than traditional methods. You can adjust the liquid content after cooking to match your preferred consistency.
Time-Saving Tip: Pressure building takes 25-30 minutes. Use this time to prep your vegetables for the second cooking phase. This smart timing helps get your caldo de res ready quickly for dinner.
Adding Vegetables Strategically
The right vegetables added at the right time will change your caldo de res from good to exceptional. This significant step will give a perfect texture to each vegetable and enhances your soup’s overall flavor profile.
Vegetable Prep Shortcuts
Uniform cutting techniques are the foundations of quick vegetable preparation. Your vegetables should be cut in fairly uniform and equal sizes so they cook evenly. The perfect spoon-friendly size for potatoes is ½-inch cubes, which lets you get a mix of ingredients in each bite.
Time-Saving Prep Tips:
- Store-bought pre-cut vegetables can reduce preparation time by a lot
- Your broth’s pressure building time is perfect to prepare vegetables
- Group vegetables based on cooking time to streamline their addition
Perfect Timing Guide
Your soup’s texture and flavor depend on adding vegetables in the right sequence. Here’s your strategic timing guide:
| Vegetable Type | When to Add | Cooking Duration |
|---|---|---|
| Hard Vegetables (carrots, potatoes) | First Round | 15-20 minutes |
| Medium Vegetables (corn, green beans) | Second Round | 10-15 minutes |
| Soft Vegetables (zucchini, cabbage) | Final Round | 8-10 minutes |
Best results come from following this sequence:
- Begin with carrots and celery among herbs
- Potatoes and green beans go in after 30-40 minutes
- Next phase needs corn and zucchini
- Cabbage should be added in the last 10-15 minutes
Texture Control Tips
Perfect texture needs attention to detail and timing. Let the meat become tender before adding vegetables to keep their beautiful color, flavors, and crunch.
Key Texture Considerations:
- Hard vegetables need longer cooking times but should stay firm
- Soft vegetables require careful watching to avoid overcooking
- Add leafy greens in the final minutes to keep them fresh
Note that vegetables like cabbage, zucchini, and chickpeas should go in after everything has come to a boil to prevent mushiness. This timing helps each vegetable keep its shape and texture while adding to your caldo de res’s harmony.
Pro Tip: Adding extra vegetables like broccoli or cauliflower means you should add another cup of water and broth to keep the perfect soup consistency.
Proper liquid levels are vital throughout this process. Your soup needs enough liquid while cooking to develop flavors and cook vegetables properly.
Serving and Garnishing
A well-presented caldo de res can lift your simple weeknight meal to restaurant quality. Here’s how you can garnish and serve this hearty Mexican soup with style while staying true to its roots.
Quick Garnish Options
Make your bowl of caldo de res stand out with these fresh, vibrant garnishes that add flavor and visual appeal:
| Essential Garnishes | Optional Enhancements |
|---|---|
| Fresh cilantro (finely chopped) | Sliced jalapeños |
| Lime wedges | White onion (finely diced) |
| Fresh mint leaves | Serrano peppers |
Pro Tip: Your garnishes will taste best when prepared during the soup’s final cooking stage. This saves time and keeps everything fresh.
Traditional Accompaniments
These vital accompaniments will make your caldo de res a genuine Mexican feast:
- Warm Corn Tortillas: Fresh-heated tortillas make all the difference. Dipping them in the broth brings out the authentic caldo de res experience.
- Arroz Mexicano:Mexican rice pairs perfectly as a side dish and adds depth to your meal. You can serve it:
- Plain and traditional
- With peas and carrots
- Mixed with assorted vegetables
- Homemade Salsa: This fresh, spicy addition brings extra heat and flavor to your soup.
Plating Tips
Your caldo de res should look as good as it tastes:
Bowl Selection and Arrangement:
- Deep, wide bowls give space for broth and garnishes
- Each bowl needs equal portions of meat and vegetables
- Large pieces like corn and potatoes should be visible
Professional Finishing Touches:
- Pour hot broth over arranged meat and vegetables
- Set fresh garnishes in small side bowls
- Keep warm tortillas in a covered container or tortilla warmer
- Place lime wedges and extra garnishes on a separate plate
Temperature Considerations: Your tortillas will stay flexible when wrapped in a clean kitchen towel or kept in a tortilla warmer. This makes them perfect for dipping in the soup.
A garnish station lets everyone customize their bowl to their taste. This hands-on approach makes weeknight caldo de res more fun while following traditional serving customs.
The perfect bowl of caldo de res delights all senses. Steam rises from the bowl, fresh garnishes add color, and various sides create an experience that turns a quick meal into a traditional feast.
Storage and Reheating
A big batch of caldo de res saves time and makes weeknight meals easier. Let me show you the quickest way to store and reheat your soup while keeping all its amazing flavors and textures intact.
Meal Prep Instructions
Your soup needs proper cooling first. Here’s everything you need to do to keep it safe and flavorful:
- Cool your soup completely using an ice bath method
- Divide into portion-sized containers
- Label each container with contents and date
- Store within 3-4 days of preparation
Container Selection Guide:
| Container Type | Best For | Duration |
|---|---|---|
| Airtight Glass | Refrigeration | Up to 5 days |
| Freezer Bags | Freezer Storage | 3 months |
| Plastic Containers | Both Methods | Varies by type |
Freezing Guidelines
Your caldo de res will taste great for up to three months in the freezer. These techniques will help you freeze it right:
Preparation Steps:
- Let soup cool completely
- Portion into serving sizes
- Leave one inch of headspace to expand
- Remove excess air from containers
- Seal tightly and label
Important: You’ll get the best results by freezing your caldo de res the same day you make it. This keeps it fresh and safe.
Quick Reheating Methods
Pick your reheating method based on your time and portion size:
Microwave Method:
- Put soup in a microwave-safe container
- Heat in 1-minute intervals
- Total heating time: 3-5 minutes
- Stir between intervals to heat evenly
Stovetop Technique:
- Put soup in a pot
- Heat on medium-low
- Stir occasionally until warm
- Add liquid if needed to maintain consistency
Pro Tips for Perfect Reheating:
- Cover soup with a paper towel in the microwave to prevent mess
- Thaw frozen soup in your fridge 24 hours before reheating
- Taste and adjust seasoning after reheating
- Warm tortillas fresh before serving
Storage Duration Guide:
- Refrigerated: 5 days maximum
- Frozen: 3 months optimal storage
- Thawed: Use within 3-4 days
Freezing individual portions makes your caldo de res perfect for:
- Quick lunches
- Easy dinners
- Portable meals
Quality Maintenance Tips:
- Keep garnishes separate
- Stock fresh cilantro and lime wedges
- Freeze broth and meat apart from vegetables
- Write contents and date on containers
Your refrigerator’s temperature should stay at or below 40°F (4°C) and your freezer at 0°F (-18°C) to keep food safe.
Reheating Best Practices:
- Heat until internal temperature reaches 165°F (74°C)
- Stir while reheating to distribute heat
- Add fresh garnishes after heating
- Heat tortillas just before serving
Your reheated soup might need more liquid. Just add hot broth or water until it looks right. This helps keep your caldo de res authentic and delicious, just like it was fresh off the stove.
Conclusion
You don’t need hours of cooking or complex techniques to make delicious caldo de res. This hearty Mexican soup fits perfectly into your busy weeknight schedule. The authentic taste comes from smart ingredient choices, pressure cooking methods, and adding vegetables at the right moment.
Your cooking efforts multiply when you prepare and store the soup correctly. Quick meal solutions await when you portion and freeze your caldo de res for future busy days. The soup’s flavor and quality stay intact when you follow food safety guidelines during storage and reheating.
The recipe’s success depends on three essential steps: proper meat browning, strategic vegetable timing, and thoughtful garnishing. These steps create authentic Mexican flavors despite the shorter cooking time. This simple approach will help you become skilled at making delicious caldo de res that fits your busy lifestyle.
What is caldo de res in English?
What kind of meat is used in caldo de res?
What are the main caldo de res ingredients?
How do you make caldo de res?
What’s the difference between caldo and cocido soup?
Can I use seasonal produce in my caldo de res?
Is homemade salsa a good accompaniment for caldo de res?
How can I make my caldo de res more nourishing?
A graduate of Le Cordon Bleu, Zoe has contributed to respected food publications and hosts in-depth tutorials on meat preparation, curing, and seasonal pairings. Her recipes emphasize both flavor and sustainability, combining classic American butchery with global culinary influences.
Through her online classes, recipe blog, and guest appearances at food conferences, Zoe empowers home cooks to approach meat preparation with confidence and integrity.


Comments are closed.