Last Updated on 15/03/2025 by SAVORY DELIGHT RECIPES LLC
Introduction
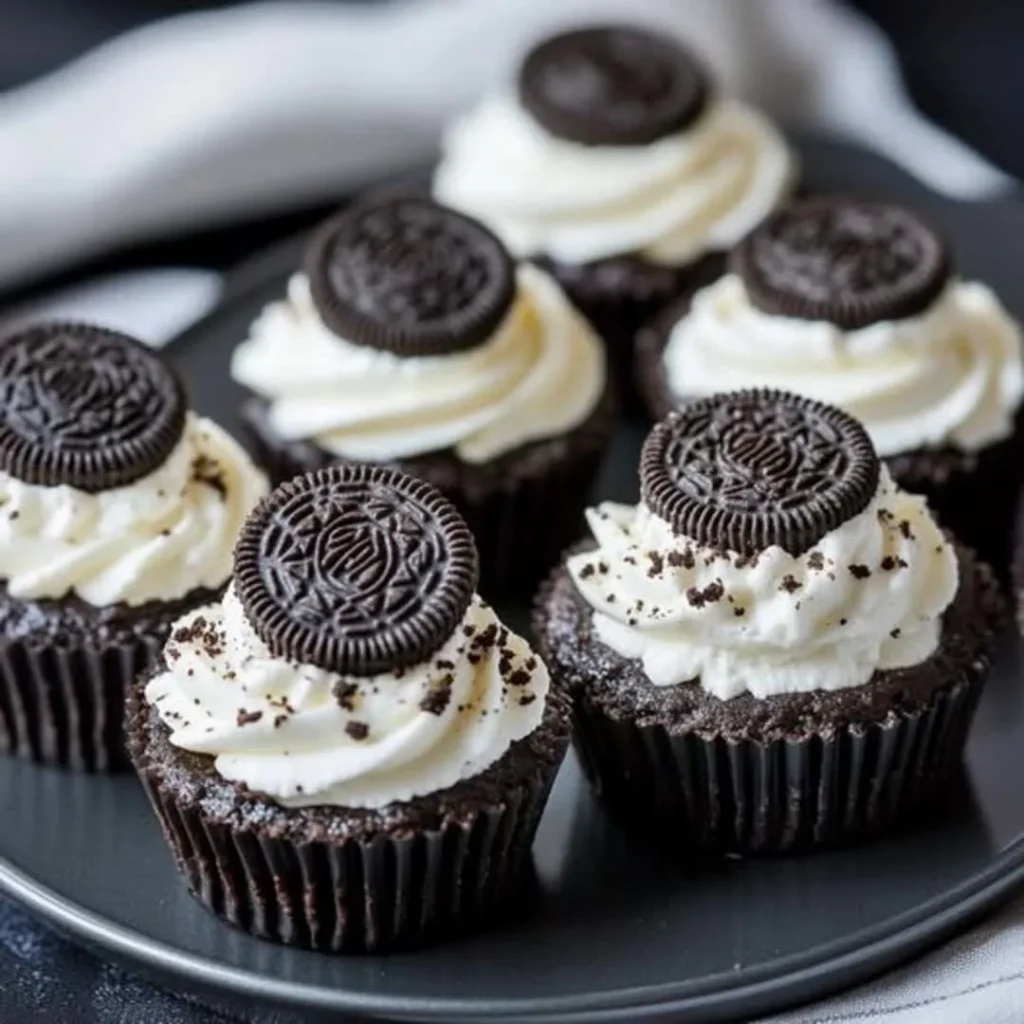
Want to whip up a crowd-pleasing dessert in under 30 minutes? Look no further than Mini No-Bake Oreo Cheesecakes! These little treats combine the irresistible crunch of Oreo cookies with a creamy, dreamy cheesecake filling—no oven required. Whether you’re hosting a party, craving a sweet snack, or just want to impress your family, this easy dessert recipe has you covered. In this guide, we’ll walk you through every step, share pro tips, and even sprinkle in some fun facts. Let’s dive into the world of no-bake cheesecake bliss!
What’s Special About This Recipe
Why are Mini No-Bake Oreo Cheesecakes the ultimate dessert? Three big reasons: they’re quick to make, surprisingly versatile, and even offer some health perks. You can have these ready in less than half an hour—no baking, no fuss. Plus, they’re perfect for any occasion, from casual snacks to fancy gatherings. And here’s the kicker: with ingredients like cream cheese and Oreos, you’re getting a treat that’s as satisfying as it is delicious. Let’s break it down.
- Quick Preparation: No oven? No problem! These mini cheesecakes come together fast, making them a lifesaver for busy days.
- Versatility: Serve them in cups, muffin tins, or jars—customize them however you like!
- Health Benefits: Okay, it’s dessert, but there’s some good stuff in here too (more on that below!).
Health Benefits and Nutrition
You might be thinking, “A dessert with health benefits? Really?” Yes, really! While Mini No-Bake Oreo Cheesecakes are a treat, their ingredients bring a little nutritional goodness to the table. Here’s what you’re getting:
- Cream Cheese: Packed with calcium and protein, it supports strong bones and muscles. A 1-ounce serving has about 5 grams of protein!
- Oreos: Sure, they’re indulgent, but they provide quick energy from carbs. Plus, that chocolatey flavor boosts your mood—who doesn’t love that?
- Heavy Cream: Adds healthy fats that keep you full and satisfied.
Of course, moderation is key, but these goodies prove dessert can be more than just empty calories. Now, let’s get to the fun part: making them!
Basic Ingredients
Here’s what you’ll need to create Mini No-Bake Oreo Cheesecakes. Each ingredient plays a starring role, and we’ve got substitutions if you need them.
- Oreo Cookies (14-16 cookies)
Role: The base and topping! They add that classic cookies-and-cream crunch.
Substitutions: Use gluten-free Oreos or any chocolate sandwich cookie for a twist. - Cream Cheese (8 oz, softened)
Role: The creamy heart of the cheesecake, giving it that smooth texture.
Substitutions: Go for vegan cream cheese if you’re dairy-free. - Heavy Cream (1 cup)
Role: Whipped into fluffy peaks, it lightens the filling.
Substitutions: Coconut cream works for a dairy-free option. - Powdered Sugar (1/4 cup)
Role: Sweetens the filling without graininess.
Substitutions: Swap with a sugar-free alternative like erythritol. - Vanilla Extract (1 tsp)
Role: Adds a warm, sweet note to balance the richness.
Substitutions: Almond extract for a nutty vibe.
These simple ingredients come together to make magic—let’s see what tools you’ll need next!
Needed Tools and Equipment
Ready to make your Mini No-Bake Oreo Cheesecakes? Here’s the gear that’ll help you nail it. Each one makes the process smoother and the results tastier.
- Mixing Bowl: A medium-sized bowl to combine your filling ingredients.
- Electric Mixer: Whips the cream and cream cheese into fluffy perfection—way faster than by hand!
- Muffin Tin: Holds your mini cheesecakes in perfect portions (use liners for easy cleanup).
- Spatula: Smooths the filling and scrapes every last bit from the bowl.
- Rolling Pin (optional): Crushes Oreos into crumbs if you want a finer base.
Don’t waste your time searching! Click the links above to get the perfect tools that will enhance your kitchen experience.
By using my affiliate link, you’ll enjoy exclusive discounts and quality guarantees. Why wait? Make every cooking step easier with the tools you need now!
Step-by-Step Instructions
Let’s make these Mini No-Bake Oreo Cheesecakes! Follow these steps, and you’ll be enjoying them in no time. Action verbs and pro tips included!
- Crush the Oreos: Place 10-12 Oreos in a zip-top bag and smash them with a rolling pin until you’ve got coarse crumbs.
Pro Tip: Leave some bigger chunks for extra texture in the base. - Prep the Base: Spoon 1-2 tablespoons of crumbs into each muffin liner, pressing them down with the back of a spoon to form a crust.
Pro Tip: Chill the tin for 10 minutes to set the base. - Whip the Cream: In a mixing bowl, beat 1 cup of heavy cream with an electric mixer until stiff peaks form (about 2-3 minutes). Set aside.
Pro Tip: Cold cream whips faster—pop it in the fridge beforehand! - Mix the Filling: Beat the softened cream cheese, powdered sugar, and vanilla extract until smooth (1-2 minutes).
Pro Tip: Room-temperature cream cheese blends easier—no lumps! - Fold It Together: Gently fold the whipped cream into the cream cheese mixture with a spatula until fully combined.
Pro Tip: Don’t overmix—keep it light and airy. - Fill the Tins: Spoon the filling over the Oreo bases, filling each liner nearly to the top. Smooth with a spatula.
Pro Tip: Tap the tin lightly to remove air bubbles. - Top It Off: Crush 2-4 more Oreos and sprinkle the crumbs on top for that classic look.
Pro Tip: Add a whole mini Oreo for a cute finish! - Chill: Refrigerate for at least 2 hours to set—or overnight for the best texture.
Pro Tip: Patience pays off; they taste even better the next day!
That’s it—easy, right? Now, let’s assemble and serve these beauties.
Assembly and Serving
Your Mini No-Bake Oreo Cheesecakes are ready to shine! Here’s how to serve them up and wow your crowd.
- Serving Tips: Pop them out of the muffin liners and place them on a platter. They’re perfect cold, straight from the fridge.
- Creative Presentations:
- Add a dollop of whipped cream and a mini Oreo on top.
- Drizzle with chocolate sauce for extra decadence.
- Serve in small jars with a sprinkle of Oreo crumbs for a rustic vibe.
These mini cheesecakes are portion-perfect for parties or a quick treat. Let’s talk storage next!
Storage/Prep-Ahead Tips
Want to enjoy your Mini No-Bake Oreo Cheesecakes later? Here’s how to store them and prep ahead.
How to Store?
- Refrigeration: Keep them in an airtight container in the fridge for up to 5 days.
- Freezing: Wrap each one in plastic wrap, then store in a freezer bag for up to 1 month. Thaw in the fridge overnight.
- Shelf Life: Best within a week, but they rarely last that long—they’re too good!
How to Prepare?
- Crush Oreos Ahead: Bag and crush them a day early—store in a sealed container.
- Whip Cream Early: Make the whipped cream up to 24 hours ahead and refrigerate.
- Assemble Later: Prep the filling and bases separately, then assemble when ready to chill.
Planning ahead makes these even easier—perfect for busy schedules!
Recipe Variations
Love variety? Here are three creative twists on Mini No-Bake Oreo Cheesecakes to suit different tastes.
- Mocha Madness: Mix 1 teaspoon of instant coffee into the filling for a coffee-chocolate kick.
- Berry Blast: Add a layer of crushed raspberries or strawberries between the base and filling.
- Peanut Butter Dream: Swirl 2 tablespoons of peanut butter into the filling for a nutty treat.
Experiment and make them your own—these are just the start!
Recipe History/Cultural Background
Where did Mini No-Bake Oreo Cheesecakes come from? Cheesecake dates back to ancient Greece, but the no-bake version is a modern twist born in the 20th century. Oreos, launched in 1912 by Nabisco, became a global sensation, inspiring countless desserts. Combining the two? Pure American ingenuity! Today, these mini treats are a hit at potlucks and parties worldwide, blending convenience with nostalgia. They’re a celebration of simple pleasures—proof you don’t need an oven to make something special.
FAQ
Got questions about Mini No-Bake Oreo Cheesecakes? Here are answers to the top queries from Google’s “More Questions” section.
- Can I make these without a muffin tin?
Yes! Use small jars, ramekins, or even a single dish for a big cheesecake—just adjust the chill time. - How long do they need to set?
At least 2 hours in the fridge, but overnight is best for a firm texture. - Are they gluten-free?
They can be! Swap regular Oreos for gluten-free ones—easy peasy. - Can I use whipped topping instead of heavy cream?
Sure, but fresh whipped cream gives a richer flavor and better texture. - How many does this recipe make?
About 12 mini cheesecakes, depending on your tin size. - Can I freeze them?
Yep—up to a month! Thaw in the fridge before serving. - What if my filling is lumpy?
Make sure the cream cheese is soft before mixing—blend longer if needed.
Still curious? Drop your questions below!
If You Like These Recipes
Loved making Mini No-Bake Oreo Cheesecakes? Try them tonight and let us know how it goes! Share your results in the comments or tag us on Pinterest—we can’t wait to see your creations. Want more easy dessert recipes? Check out these gems from trusted sources:
- No-Bake Chocolate Tart
- Peanut Butter Pie
- Lemon No-Bake Bars
- Cookies and Cream Fudge
- Strawberry Cheesecake Cups
Happy no-baking!
Mini No-Bake Oreo Cheesecakes
Equipment
- Mixing Bowl
- Electric Mixer
- Muffin Tin
- Spatula
- Rolling Pin (optional)
Ingredients
Crust
- 10-12 Oreo cookies crushed into coarse crumbs
Filling
- 8 oz cream cheese softened
- 1 cup heavy cream
- ¼ cup powdered sugar
- 1 tsp vanilla extract
Topping
- 2-4 Oreo cookies crushed for sprinkling
Instructions
- Crush 10-12 Oreos in a zip-top bag using a rolling pin until coarse crumbs form.
- Spoon 1-2 tablespoons of the crushed Oreos into each muffin liner, pressing them down to form a crust. Chill for 10 minutes.
- In a mixing bowl, beat 1 cup of heavy cream with an electric mixer until stiff peaks form. Set aside.
- In another bowl, beat the softened cream cheese, powdered sugar, and vanilla extract until smooth.
- Gently fold the whipped cream into the cream cheese mixture until fully combined.
- Spoon the filling over the Oreo crusts in the muffin liners, filling nearly to the top. Smooth with a spatula.
- Crush 2-4 more Oreos and sprinkle the crumbs on top for decoration. Optionally, add a whole mini Oreo on top.
- Refrigerate for at least 2 hours, or overnight for best results.
Notes
She holds a culinary arts certification from the Culinary Institute of America and has worked as head chef in top smokehouses across the South. Olivia is known for her step-by-step meat tutorials and her commitment to teaching others how to cook confidently with beef, pork, and poultry.
As a featured contributor to several culinary magazines and food blogs, Olivia’s expertise is backed by years of testing, refining, and innovating meat-based recipes that blend tradition with creativity.
- One-Pan Chicken with Buttered Noodles: 3 Easy Steps - 20/07/2025
- Taco Ranch Bites: 3 Simple Steps for Flavor! - 20/07/2025
- Buffalo Chicken Pasta: 3 Secrets You Need Now! - 20/07/2025